Introduction
This is a short introduction to a simple way of exposing a GUI for Csound via a web server. The web server is Flask[1], a minimal yet powerful web server written in Python. Communication from Flask to Csound is via the Python API. The GUI components (sliders, buttons, etc) are created in jQuery[2] UI[3]. By adding a single library line, the GUI components become touch-sensitive, thus enabling control from Android or iOS devices!
The title of this article is meant as an eye-catcher, because the terms 'GUI' and 'headless' are mutually exclusive. This concept is not limited to the Pi of course; it can be used on any system. With the arrival of the much improved Raspberry Pi 2 this is a nice way of controlling Csound by running it on the Pi. Running the Pi headless (no Desktop started) gives the most processing power for Csound, so this is an ideal combination.
We will first explore one way communication via (AJAX) POST and then a new and better method via Web sockets. The latter also allows for bi-directional communication. Some knowledge of the following subjects is useful: Python, HTML, JavaScript, jQuery and the Csound (Python) API.
I. Web GUI via POST
The evolution of dynamic web content
A web page running in a browser can be seen as a client getting its content from a web server. In the early days of the Internet these pages were static HTML pages. The need for dynamic web content brought us techniques such as JavaScript, AJAX, and a library called jQuery. JavaScript, although part of a HTML page (that comes from a web server), runs in a Browser. It is therefore called 'client-side'. Once a web page is loaded in the browser, JavaScript can change the page layout, color or even animate graphical objects. With a jQuery library called jQuery UI (User Interface) one can quickly create sliders, buttons, check boxes, etcetera. We would like to control Csound with these GUI objects: but how? Do not forget that these GUI objects only run in the browser, thus 'client-side'. In the case of Csound running with pNaCl, in the Chrome browser, not much more is needed, since everything is client-side. In our case, Csound runs on the Raspberry Pi. Luckily there exists a Python web server, called Flask. Flask will render the webpages with the GUI elements — to be displayed in a browser. To communicate GUI changes like slider positions to the web server (Flask), jQuery Ajax calls are used. Now the picture is nearly complete. Since the web server is a Python application, we can simply interface Csound via the Python API.
Installation
First we have to install Flask on the Pi. This is easy via pip, so if you do not have pip installed yet, you can do that with:
sudo apt-get install python-pip
After pip is installed, you can use it to install Flask and its dependencies:
sudo pip install flask
Download and unzip the source files that come with this article and place the flasky folder following the path indicated below. You can download the examples shown in this article from the following link: flask_srcs.zip.
/home/pi/Desktop/python
(You may need to create the folder named 'python' on your Desktop, or use a different directory structure.) What is important is that the directory structure from the zip file needs to be intact like:
flasky			# the root folder
->static		# folder needed by Flask
--->css			# contains the css files
--->js			# contains all the required java script libraries
--->metro_adsr.csd	# our csd file
->templates			# folder needed by Flask
--->adsr.html		# the web page that will be rendered
->flasky.py			# the Flask web server and Csound API interface program
Note: You could download the zip file via the browser in a GUI session on the Pi, or download it first on OS X, Linux or Windows and then transfer the zip content to the Pi, using this command:
scp -rp flasky pi@10.0.1.29:/home/pi/Desktop/pythonThe IP address needs to match your Pi's address. When on Windows, use Putty to execute this command.
II. Action!
Start it up
On the Pi, in the Flasky folder, execute the command:
python flasky.py
This starts the web server. Then on another device in a browser, type:
http://10.0.1.29:8080/
The IP address should match your Pi's IP.
You should see a web page with four vertical sliders and a button. By operating one or two sliders you should hear the output on the Pi. With the button the metronome can be turned on or off.
Now try the same procedure using a browser on an Android or iOS device to operate the sliders. This should also work. Amazingly, we have not written one line of code on these devices!
If you look at the file adsr.html, you see the lines:
<script type="text/javascript" src="js/jquery-2.1.1.min.js"></script>
<script src='js/jquery-ui.min.js'></script>
<script src="js/jquery.ui.touch-punch.min.js"></script>
<link rel="stylesheet" href="css/jquery-ui.min.css">
Just by including the line including touch-punch.min.js, touch sensitivity is added to the jQuery UI elements.
These sliders are just some basic jQuery sliders, certainly not the prettiest ones. There are numerous improved GUI sliders and elements on the web, based on jQuery.
I use the free edition of PyCharm (CE) as my favorite editor for Python, .html and .csd files.
Some explanation and further notes
While it is not my intention to go deeper into Flask or web programming, some further explanation is needed.
If you look at the javascript code for the sliders in adsr.html, you will notice that a function called post() is called where data is sent in JSON format, as shown below.
function post(){
    $.ajax({type : "POST",
    data:{"A1Val":A1Val,"D1Val":D1Val,"S1Val":S1Val,"R1Val":R1Val,"OnOffVal":OnOff},
    dataType : "json"
    });
Notice that all the variables are sent in the AJAX post to the server, although only one value might be changed. This is because we can only have one post to the endpoint ('/').
In the server, flasky.py, this post is intercepted as shown in the code below.
@app.route('/', methods=['GET', 'POST'])
def template():
	if request.method == 'POST':
		A1Val = request.form['A1Val']
		D1Val = request.form['D1Val']
		S1Val = request.form['S1Val']
		R1Val = request.form['R1Val']
		OnOff = request.form['OnOffVal']
		cs.SetChannel("a1", float(A1Val)/100.0 + .001)
		cs.SetChannel("d1", float(D1Val)/100.0)
		cs.SetChannel("s1", float(S1Val)/100.0)
		cs.SetChannel("r1", float(R1Val)/100.0)
		cs.SetChannel("onoff", float(OnOff))
		# need to return something
		return "ok"
	        else:
		return render_template('adsr.html')
Communication is now uni-directional, from the client to the server. Two-way communication is also possible by using web sockets. We will explore this in the next section.
It is also possible to add animations using Snap SVG, as can be seen on my website: http://www.resona.nl/csound/websynths.html. This is outside the scope of this article. However, we will be using a little SVG to create a VU meter in the next section.
III. Web sockets (bi-directional)
Web sockets are a more modern way to communicate between client and server. It allows for very fast, two-way communication. The previous example was in fact not so neat, because all the data had to be sent using a single POST.
With web sockets this limitation is removed. It is much faster, and it allows for two-way communication—also from server to client. Say we want to show some (RMS) levels in a VU meter in the client. That is exactly what we will be doing now. At the same time, sliders and buttons need to send data to Csound, running alongside the Flask web server. In the next example—flasky2, a distortion effect—I used some code from the McCurdy collection[4], and replaced the FLTK code with the jQuery UI equivalents. The web GUI looks like this on my Mac:
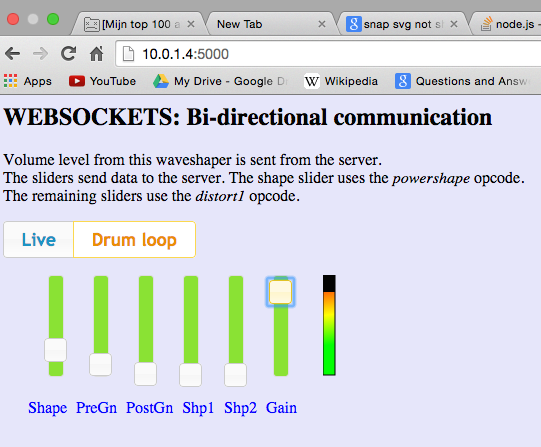
Figure 1. Web GUI on Mac.
You will see the familiar jQuery UI sliders, two radio buttons for input type selection (drum loop or live input) and the VU meter.
The VU meter is created with Snap SVG and it consists of two overlapping rectangles, one with the gradient and a black one on top. By changing the height of the black rectangle (proportional to the level) the VU meter is animated. Note that the port number is 5000 now. That is the default port number for Flask, because in the code no port number was specified.
How does it work?
As usual, the Flask web server renders the HTML page (gitarFxVU.html). After the page is loaded, a JavaScript section is executed containing jQuery code, and also a web socket connection is made to the server.
Data is then sent to the server as shown in the code below.
socket.emit('channel', {channel:'shape', data:ui.value/100.0})
Here, channel is just a kind of topic (you could compare this to an OSC address pattern).
The data that follows contains the channel name (shape) and the value for the channel.
On the server (flasky2.py) the code this is shown below.
# this decorator passes the channel name and value to Csound
@socketio.on('channel', namespace='/test')
def test_message(message):
	#print message['channel'], message['data']
	cs.SetChannel(str(message['channel']), float(message['data']))
Note that this code is used for all channels! For the VU level, the server polls the rms value and sends this to the client using the following code:
 	while True:
		time.sleep(.05)
		vol = cs.GetChannel("volume")
		socketio.emit('volume',
                      {'data': 'Server generated event', 'vol': vol},
                      namespace='/test')
(This polls every 50 ms, and could be even faster if desired). On the client-side, in Javascript we have this code:
    // event handler for server sent data, update the Snap SVG VU meter
    socket.on('volume', function(msg) {
        rect2.attr({height:100 - msg.vol*100});
    });
This updates the height of the black rectangle.
IV. Conclusion
In both Flask examples you will note that debug = False. When debug is True, Flask starts another Python instance for a Werkzeug session. This also starts Csound twice, so this is not recommended.
If you want to make GUI interfaces for smart phones or tablets, you should consider resolution and screen sizes. You may need to create more web templates for these specific targets. On the other hand, there is Bootstrap (http://getbootstrap.com/) that more or less automatically does this for you.
During testing, I noted that the SVG VU meter did not show up on my older iPhone (3) and on a Sony Android 4.0 tablet. It did show up on my Honor (Huawei) Android 4.2.2 phone. However the sliders and buttons worked on all devices.
References
[1]Armin Ronacher, "Flask, a micro webdevelopment framework for Python." [Online] Available: http://flask.pocoo.org/. [Accessed July 17, 2015].
[2]The jQuery Foundation, "jQuery, a fast, small, feature-rich JavaScript library." [Online] Available: https://jquery.com. [Accessed July 17, 2015].
[3]The jQuery Foundation, "jQuery UI, a curated set of user interface interactions, effects, widgets, and themes built on top of the jQuery JavaScript Library." [Online] Available: https://jqueryui.com/. [Accessed July 17, 2015].
[4]Ian McCurdy, "CsoundRealtimeExamples." [Online] Available: http://iainmccurdy.org/csound.html. [Accessed July 17, 2015].
Addtional Links and Information
Matt Richardson, "Serving Raspberry Pi with Flask." [Online] Available: http://mattrichardson.com/Raspberry-Pi-Flask/. [Accessed July 17, 2015].
David Furfero, "jQuery UI Touch Punch, Touch Event Support for jQuery UI." [Online] Available: http://touchpunch.furf.com/. [Accessed July 17, 2015].