Introduction
Ableton Live is an audio production software that emphasizes real-time live performance. It provides an intuitive and fast method for sequencing audio and MIDI. Csound is many things to many people but I have rarely heard it described as intuitive. By integrating the two tools, we can combine the flexibility and power of Csound with the ease of use and accessibility of Live.
In this article, a method of routing audio and MIDI data between the two applications will be outlined. This will allow Csound to be used as a synthesizer or effects processor within an Ableton Live based production. The focus will be on a Windows based setup but the process can be replicated in OSX with similar tools.
I. Routing audio between applications
Installing and configuring JACK
JACK is an audio routing application that will be familiar to Linux audio users. It allows the user to connect audio from one application to another in much the same way as a patch bay works in a hardware based studio. A relatively recent development is the Windows port for JACK, which we will be using here.
The JACK software can be downloaded from http://jackaudio.org/download. We will be using the JACK2 v1.9.5 for Windows. The package includes a graphical installer and pre-compiled binaries that save us a lot of headache. Once installed, you will find the JACK applications installed at C:/Program Files/jack-1.9.5.
After installing JACK, we need to find out what it thinks our audio hardware is named. Given JACK's Linux heritage, it is not surprising that there are a number of command line tools involved; however, their use will be kept to a minimum. Open a command prompt (Windows Menu, run cmd) and enter the following commands.
cd \"Program Files"\jack-1.9.5
jackd -d portaudio -l
The output of the command will be a list of audio devices that JACK finds. Note down the name of the audio device you want to use. It should in a format similar to “ASIO::asio4all”. ASIO devices are preferred because they generally offer higher performance in terms of latency.
Using QJackCtl to manage Jack Settings
At this stage we could use the various JACK command line tools to start the JACK server and make connections between different audio applications. However the JACK installation includes a GUI application called QJackCtl (Figure 1) that makes life easier. QJackCtl should be installed in the same path as the jackd application.
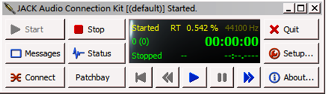
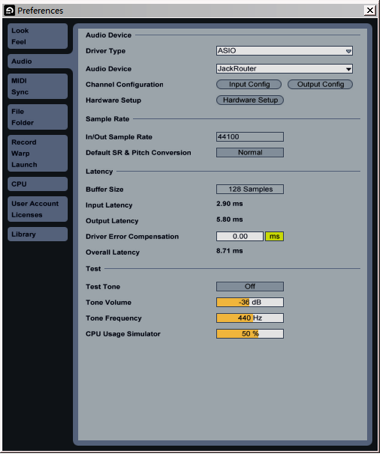
If you go into setup options you can configure JACK to use your hardware. The first step is to set the interface setting to the string noted down earlier, in my case it was ASIO::asio4all. Then you need to set the server path to "jackd -S", the driver to "portaudio" and the Frames/Period and Sample Rate to match what your hardware uses as shown in Figure 2. When you are done click OK, then press the Start button in the main page. The display should now read “Started”. If JACK does not start then you can look at the status and message pages to try and debug the problem.

Configuring Ableton Live to use JACK
The next step is to setup Ableton Live, as in Figure 3, to use the JACK server instead of using your audio interface directly. With QJackCtl running and JACK started, launch Live and go to the Settings/Audio page. In order to use JACK with Live you will need to set the Driver Type to ASIO and then select JackRouter as the Audio Device.
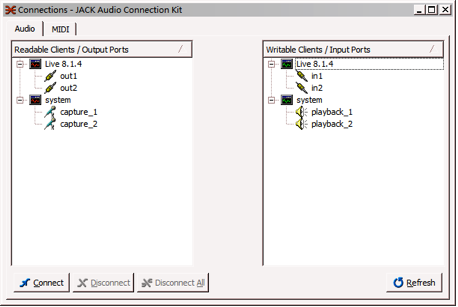
If you go back to the QJackCtl GUI and open the Connections page, as in Figure 4, you will now see the Live input ports and outputs alongside the system inputs and outputs. The system inputs and outputs refer to your audio interface’s inputs and outputs
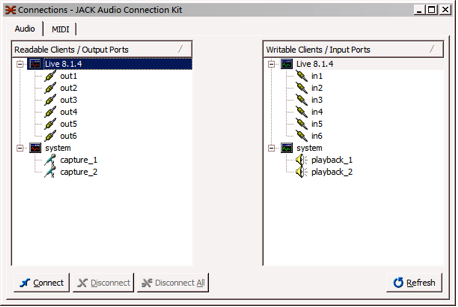
You will notice Live has only two inputs and two outputs. This behavior can be changed by editing the JackRouter.ini file in the JACK directory as seen in Figure 5.
[IO]

  input=2

  output=2

  [AUTO_CONNECT]

  input=0

  output=0
The IO section, as shown in Figure 6, sets the default number of inputs and outputs into any application using the JackRouter driver. I would suggest setting these to the number of hardware inputs plus the number of audio channels you want route between Csound and Live. You will need to restart Live and change the input/output config in the Live Settings/Audio page after you update the JackRouter.ini file.
Configuring QuteCsound to use JACK
You can setup QuteCsound to use JACK in much the same way as you did for Live. Under Configure/Realtime Play, set the RT Audio Module to “portaudio” and set the input/output devices to the JackRouter adc/dac’s. The QuteCsound ports will not appear in the QJackCtl connections page until you actually start Csound.
Routing audio between Csound and Live
Now comes the fun part, which is actually running audio from Csound into Live. After you launch QJackCtl and start JACK, start Ableton Live and setup an audio track, shown as in Figure 7, monitoring the first input pair.
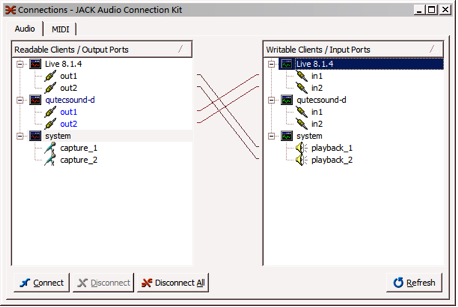
Next start QuteCsound, load “Boulanger – Trapped in Convert” from the Example/Music menu and press the Run button. Go into the QJackCtl connections page and connect the QuteCsound output ports to the Live input ports and connect the Live output ports to the System Playback ports, as shown in Figure 8. With any luck you should hear Dr Boulanger’s classic composition playing in Live.
Using Csound as an Effects Processor for Live
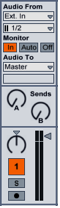
The next step is to route audio from Live into Csound and then back into Live. This allows you to use Csound as an effects processor for your Live clips. In Live, create an audio track and insert an “External Audio Effect” device from the Live Devices/Audio Effects menu. Set the “Audio To” dropdown to “3/4” and the “Audio From” to “1/2” as shown in Figure 9. You can rename the device as “Csound” and save it as a preset if you want. Later on you might want to adjust the Hardware Latency setting to compensate for latency buffering audio to and from Csound.

QuteCsound has an example .csd file called “Audio Thru Test” in the Examples/Utility menu. This is a good example to test our routings. You will need to enable the outputs in the Widget panel so the audio actually goes through Csound.
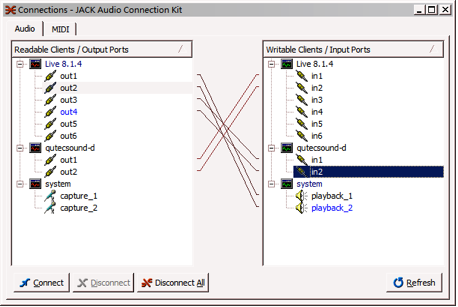
In QJackCtl, you can setup the routings from Live to Csound and back. After setting the routings, as in Figure 10, you should be able to play a clip in Live and the External Audio Effect will route the audio to Csound and back again into Live.
II. Routing MIDI between Applications
Virtual MIDI drivers
Now that you can pass audio between Csound and Live, you are going to want to pass control signals too. The much maligned MIDI protocol is definitely the easiest way to go about it. There are a number of virtual MIDI cables available for Windows. For 32bit Windows, you can use Maple Virtual MIDI Cable, MIDI Yoke NT or LoopBe. LoopBe is the only one I could find that will work with 64bit versions of Windows.
Once installed, you should be able to setup a MIDI track in Live and have it send MIDI data to your virtual MIDI cable. In QuteCsound, you can setup a MIDI input from the virtual MIDI cable and receive MIDI data from Live. Not only will this allow you to use Csound as a synthesizer for Live, it will also allow you to control parameters in a Csound effects processor. Alternatively you could connect the MIDI in the opposite direction and use Csound as a MIDI source to control devices in Live. With two virtual MIDI cables; you could also use Csound for MIDI effects.
III. Taking it further
Over The Network
JACK will allow you to route multiple channels of audio over a network. With gigabit Ethernet cards, a crossover cable and high MTU setting (maximum transmission unit), the performance and latency is more than satisfactory. This opens a number of interesting possibilities. For example, a spare machine could be pressed into service as a dedicated Csound processor running CPU heavy orchestras. Since the audio is sourced via the network, a second audio interface is not required. There are a number of network MIDI tools that could be used for control signals or alternatively OSC (Open Sound Control) could be explored.
IV. Conclusion
JACK is a very useful tool for musicians looking to integrate different toolsets. Applications that were once "walled gardens" can now be links in a processing chain. Mixing and matching functionality from Csound, Ableton Live or any other music application allows us to play to the strengths and weaknesses of each application and create an idiosyncratic approach to creating music.